I'm McKay, owner of Hyperpeak Remodeling, and after years of remodeling homes across Southern Utah, I can tell you that the single biggest cause of blown budgets and delayed projects isn't bad materials or bad contractors. It's doing things out of order.
I've made that mistake myself. I've also inherited projects from other contractors where the damage was already done. And I've had the satisfaction of running jobs where every step happened at the right time, and everything just... flowed.
The sequence below is what I follow on every project. Whether you're tackling a single bathroom or a full home remodel, getting the order right is what separates a smooth renovation from a frustrating one.
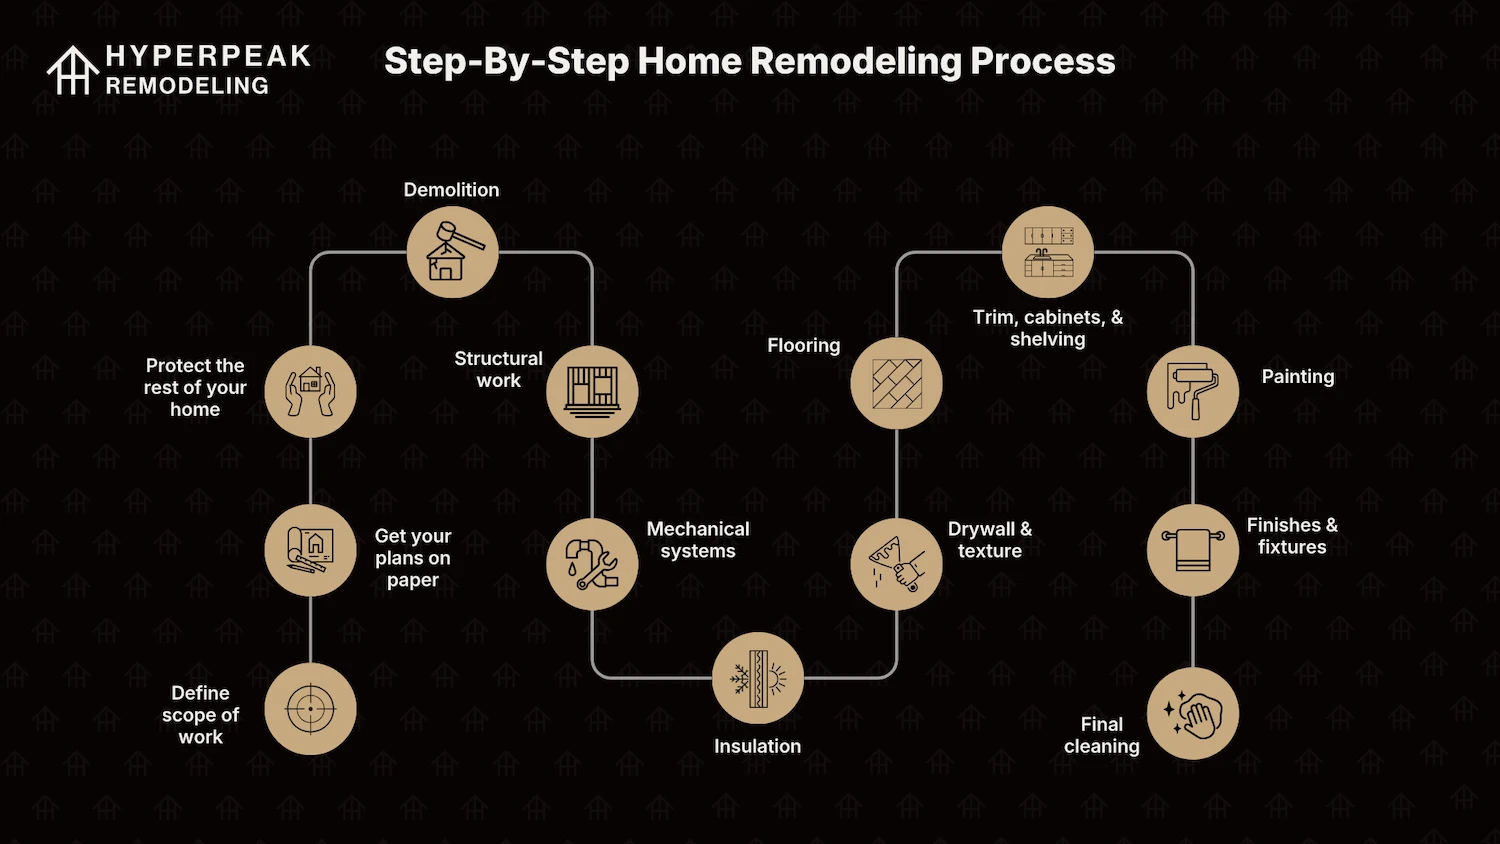
TDLR; Here's the complete sequence at a glance:
- Define the scope of work
- Get plans on paper (permits, engineering, material selections)
- Bring in your designer
- Protect the home
- Demolition
- Structural work
- Mechanical systems (plumbing, electrical, HVAC)
- Four-way inspection
- Insulation
- Drywall and texture
- Flooring
- Trim, cabinets, and shelving
- Paint
- Finishes and fixtures
- Final cleaning
Every step is there for a reason. Skip one, and you're not saving time… you're borrowing it from a later stage where it's going to cost you more to fix.
Step 1 – Define the Scope of Work
Before a single tool gets picked up, you need to know exactly what you're doing. This sounds obvious, but it's where most projects quietly go off the rails.
I once worked on a pool house project where the original plan was straightforward: add a roof to an existing brick structure, run electrical, hang drywall. Midway through, the homeowner decided they wanted the roofline raised to fit a golf simulator. That meant stopping work, bringing in engineers, redoing the structural design, and pushing the timeline back significantly. None of that would have happened with a clear scope agreed to on day one.
Before you hire anyone, write down your goals. Are you remodeling for function? For resale value? For style? Get specific, get it in writing, and lock it in before you start scheduling trades.
Step 2 – Get Your Plans on Paper
Once the scope is defined, document everything. This includes:
- Drawn-up plans
- Permit applications
- Engineer approvals (when required)
- Material selections
You cannot keep a remodel in your head. Written plans give every contractor, inspector, and subcontractor a shared reference point, and they protect you when something doesn't go as expected.
This is also the stage where you need to think about soil conditions if you're in Southern Utah. Depending on your lot and the nature of your project, the city or county may require a soil test before you can pull permits. That adds time to your pre-construction phase, so plan for it early rather than being surprised by it later.
Step 3 – Bring in Your Designer
Once you know what's structurally and financially possible, bring in a designer. The right sequence matters here. You define the scope first so the designer isn't working in a vacuum. They need to know what the budget allows, what walls can or can't move, and what the plan is before they start making finish selections and space planning decisions.
If you hire a designer before you've done that groundwork, you risk falling in love with a vision that doesn't match your budget or your building constraints. For a deeper look at how to get the most out of a design relationship, read our interview with Azelia and Chantelle from Interiors by Design.
Step 4 – Protect What Matters
This step gets skipped more than any other, and it's almost always because homeowners are excited to get started. Don't skip it.
Before demolition begins, protect your floors, walls, and HVAC. Lay protective paper on walkways, tape off areas that aren't being touched, plastic off HVAC returns so dust doesn't circulate through the whole house, and move or cover anything with sentimental value.
This matters even more if you're living in the home during the remodel. Skipping protection doesn't just create mess… it creates damage, and damage creates cost.
Step 5 – Demolition
Demo is the moment everyone pictures when they think about remodeling. It's satisfying, but it's also where careless mistakes happen fast.
Knocking out the wrong wall, leaving debris piled in walkways, or rushing through tear-out creates problems for every trade that follows. Take it methodically. Remove things piece by piece. Confirm with your contractor exactly what's coming out and what's staying before the sledgehammer comes off the truck.
Step 6 – Structural Work
Any framing changes, load-bearing wall modifications, foundation pads, or structural additions happen now, while the walls are open and nothing has been committed downstream. If you're doing a home addition or any work that involves slab, this is also when underground utilities get roughed in before concrete is poured.
Do not skip or defer structural work. Every step after this builds on top of it.
Step 7 – Mechanical Systems (Plumbing, Electrical, HVAC)
With the structure in place, your mechanical trades move in. Plumbing, electrical, and HVAC all get roughed in before any walls are closed.
This step requires the planning you did in Step 2 to be solid. Decisions that seem minor on paper have real consequences here. A shower with two handles requires a completely different plumbing configuration than a single-handle trim. Cabinet placement determines where outlets need to land. HVAC duct routing depends on ceiling heights and framing decisions made in the previous step.
Get these decisions made before the trades show up, not while they're standing there billing you by the hour.
Step 8 – The Four-Way Inspection
This is the most important inspection in the entire remodeling process, and it has to happen before you can move forward.
A four-way inspection is a single visit from your city or county building official who examines all four major systems at once: framing (structural integrity, fire blocking, braced panels), rough electrical (wiring, boxes, panel connections), rough plumbing (supply lines, drains, vents, pressure tests), and rough mechanical/HVAC (ducts, exhaust fans, gas lines).
It's called a four-way because all four systems are inspected in one visit, while the walls are still open. Once you pass, you can close the walls. If you fail, you fix the issue and reschedule. Utah's building inspection requirements make this a mandatory checkpoint, not an optional one.
Do not skip it. Do not try to work around it. The walls cannot be closed until you have a passing inspection, and if you close them early, you will be ordered to tear them back open.
Step 9 – Insulation
With a passing four-way inspection in hand, insulation goes in. Whether you're blowing it into attic cavities or spraying it into walls, the key is efficiency. Schedule all your insulation in one shot rather than having a crew come back multiple times. Every return visit adds cost and complexity.
Step 10 – Drywall and Texture
Drywall goes up after insulation is complete. This is also when you finalize your texture decision: smooth, orange peel, knockdown, or something else. If you're remodeling only part of the home, matching the existing texture is almost always the right call unless you're prepared to retexture the adjacent spaces too.
Step 11 – Flooring
Here's where contractors disagree, so I'll tell you exactly where I stand and why: flooring comes before paint.
The common argument for painting first is that it's easier to cut in without flooring in the way. The problem is that flooring and trim installers will scuff, scratch, and nick fresh paint. You end up touching up anyway, and often more than once. Install your tile, LVP, or carpet now. Then bring in trim.
For a full breakdown of the finish and remodeling decisions that quietly hurt your home's value instead of helping it, see the six things that devalue a house most. Several of them come directly from doing work out of order or skipping steps.
Step 12 – Trim, Cabinets, and Shelving
Baseboards, door casing, and cabinets come after flooring for a reason. When trim is installed on top of finished flooring, it sits cleanly at the floor line. When it's installed before flooring, you end up shimming or using quarter-round to fill the gap. Quarter-round is fine in some applications, but it's a workaround, not a finish detail.
Cabinets go in at this stage too. Get them fully installed before countertops are templated.
Step 13 – Paint
Now you paint. The flooring is in, the trim is in, the cabinets are in. Painters can tape everything off in one pass and do the work cleanly without worrying about what comes after them.
Painting at this stage is more efficient because the room is fully defined. The painter knows exactly what they're working around.
Step 14 – Finishes and Fixtures
This is the stage where the remodel comes to life: countertops, plumbing fixtures, light fixtures, hardware, mirrors, and all the finish details that make a space feel complete. These go in last because they're the most vulnerable to damage during construction.
Step 15 – Final Cleaning
Professional cleaning is not optional if you care about the result. Construction dust gets into everything. A cleaning crew that specializes in post-construction cleans will get the home to a genuinely move-in-ready condition. Don't hand a client (or yourself) a beautiful remodel covered in drywall dust.
What Happens When You Fall Out of Order
On the Summers full home remodel in Washington, Utah, we learned this the hard way on a couple of fronts. Early in the project, a flooring material error by a subcontractor required reordering, which created a three-week wait. We had to pause cabinet ordering until flooring was complete and delivery space was available, which cascaded into cabinet delays and pushed the overall timeline back significantly.
The lesson we documented from that project: complete each phase fully before beginning the next. Overlapping stages, like starting rough work while paint is still drying in another room, creates rework. Order all materials on day one. And lock in the full project scope before scheduling begins, because mid-project changes to layout or fixtures move electrical, shift timelines, and affect every trade that follows. You can read the full breakdown in the Coral Canyon Full Home Remodel case study.
By contrast, on the Salerno project, we followed the sequence exactly. The result was a project that moved on schedule with no rework, no scrambled trades, and a client who walked into a finished home without the chaos that usually accompanies a remodel of that scope. Sequence isn't just theory… it's the difference between those two outcomes.
A Note on Southern Utah Specifically
If you're building new or doing work that involves a footing or foundation, be aware that some areas in Washington County will require a soil test before permits are issued. Southern Utah's geology varies, and certain soils have expansion and settlement characteristics that affect foundation design. It's not a common requirement on straight remodels, but on additions and new construction it comes up. Budget time for it, not just money.
If you're planning a full home remodel in Southern Utah and want a team that runs a clean, sequenced job, book a free estimate call and let's talk through your project.

Schedule Your Free Estimate
Book a call with McKay to discuss your project, ask questions, and get a clear proposal with pricing and timelines. No pressure, no obligation, just clear next steps.